JANUARY 2021
Welcome to the SE-BOSS Blog post.
Scroll through the photos below and watch my dream 79 build evolve as I search for my ultimate set up.
Below that you’ll find an in-depth blog post from the day I bought the vehicle to where we are now.
Enjoy.
Shannon


JANUARY, 2021
Welcome to the SE BOSS build. On this build we’re going to step outside our comfort zone, break away from the usual style of builds we do and test a few concept ideas and designs and set a bench mark in our touring vehicle builds.
Using Australian made products and companies where we can and supporting many local businesses along the way, with our combined knowledge, expertise and overall passion for the 4WD industry, at the end you’ll see a quality built, ready-to-go anywhere Australian touring vehicle.
Starting off, I’m going to write this blog post a little different from the others, as its my personal car, hence the name, SE BOSS, (the bosses car) and show you guys in depth how the process happens, and the amount of work, effort and time it takes to build or own a vehicle like this. You’ll see progress photo’s along the way and a gallery at the end if you want to skip to that.
The big decisions made in this build as far as brands used and features were chosen on my personal requirements at the time and what I found to be important to me. There are a lot of options to choose from when building your LC79 all depending on your budget, type of touring and family size and so you’ll see each build on our website is unique to each owners preference and what was important to them.
Grab a beer, sit down and enjoy the read, don’t forget to leave your comments below.
Thanks Shannon
——————————————————————————————————————————————————————————————–
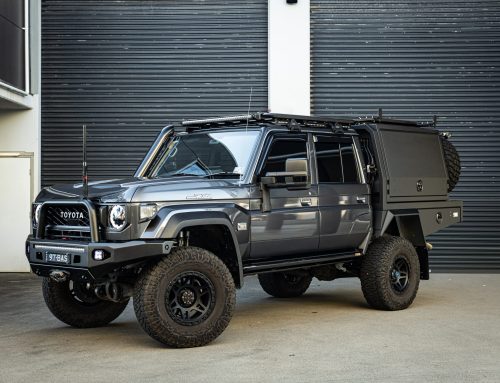
 Starting this build off with a brand new unregistered VDJ79R Toyota LandCruiser twin cab. I have chosen the Merlot red colour, not because I like red, but because there is basically nobody else with this colour (at the time of writing this). Working with 79’s all day long we see a ‘trend’ in colour all the time so wanting to be different, I have chosen this.
 First step is to install the portal axles and upgraded suspension as this must be done before rego or any other accessories fitted. The portal axles used here are a product of Marks 4WD Adaptors. The main key features of this set-up are 6″ drop down hubs, giving you an instant 150mm clearance under the diff with no changes to your suspension/steering or handling geometry. In fact, they’re also much wider than standard diffs so your car will handle better on and off-road with greater stability & footprint and this is modification is 100% street legal Australia wide under second stage manufacturing. Other advantages with the portal axle conversion are upgraded brakes, 16% reduction gears, one piece air locking hubs and the drum handbrake relocated to the rear of the transfer case.
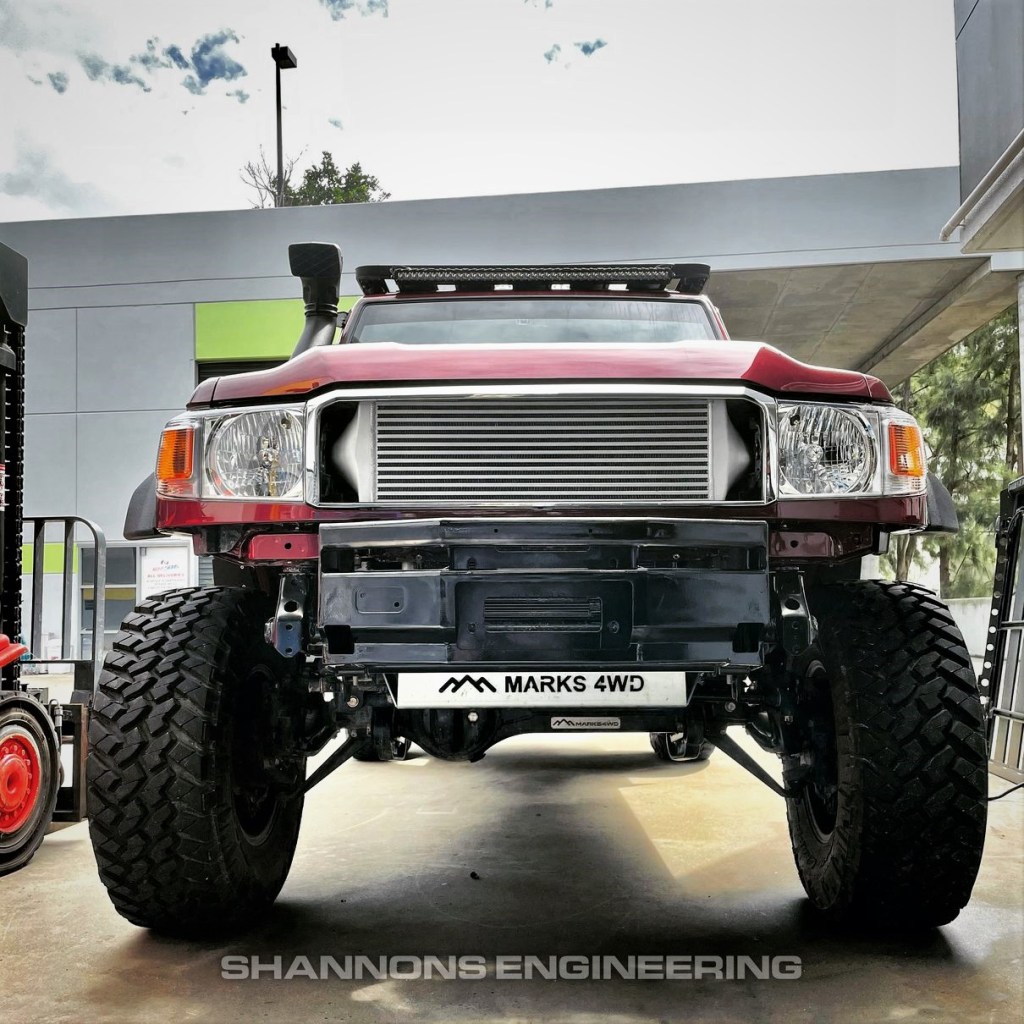
 As you can see the image above the benefits of this set up and ground clearance, and its also fully street legal with these larger tyres.
 For the suspension, (as this is separate from the portal axles) I have chosen to retain the leaf spring design and opted for parobolic leafs from Terrain Tamer. As you can see, they’re not your typical leaf pack and only have 4 leaf’s per side, greatly reducing unsprung dead weight while still allowing a 3950kg GVM upgrade and the ability to flex somewhat more than a typical set of leafs. From my observation this set up allows more flex than other coil conversions on the market.
 Its back at the shop and here we are installing the RhinoRack roof platform fitted with LED light bar and under-eve side lighting a common addition to all our builds.

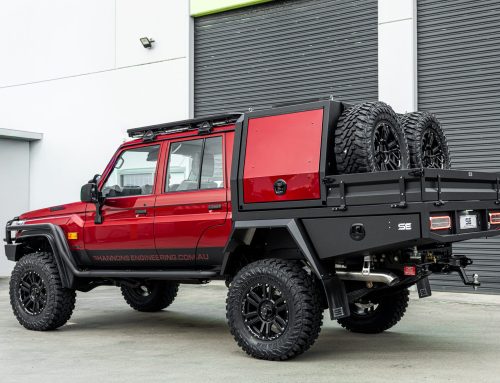
The tray we built for this build is almost the same as our regular builds other than a few new features we are trialing, like a rear tapered tailboard, quick-connect water system and a removable kitchen pod instead of a trundle draw. More on that later.
 For the shocks I have decided to go with Kings Offroad Racing Shocks with adjustable remote reservoirs, front and back. I strongly believe your shocks play the biggest part in ride comfort and not to skimp out when considering choice on shocks. For the front suspension I have gone with Lovells heavy duty coils with a 1″ lift. Still 100% street legal as this is the legal lift limit is governed by your headlight height. You can however have a 2″ lift fitted with these portals but you must then lower your headlights into your bull bar. I am planning on something special for my front bar so that wont’t be an option for me, more on that later.
I have also upgraded my front flares to a fiberglass overmould giving my wider front wheel track cover and eliminating the need for rubber flaps.
 A good view of the new concept tray design. You can see from here the thought gone into the layout of the tray and utilizing every space possible underneath. The aluminum flooring sheets are removable at any time if you ever need to access any of this equipment or just a thorough wash down. You can see the water tank up front, keeping the weight in the centre and over the axle, rear draw carcus and the air system and alloy air tanks between the draw and the toolboxes. Theres a twin piston ARB air compressor in one toolox and a 36v electric chainsaw in the other along with all my tools and recovery gear which I would like to keep on me regardless if the canopy is attached or not.
 The first look of the new tray. From this shot you can really see how wide the new diffs really are, especially in the front in this shot.
 A few small details here to note are the widened guards to accommodate the wider wheel track, quick connect tap outlet, canopy connection plug and a new feature prototype with the leading edge of the headboard has been shaved off to give the tray design more angles and detail.
 Rego ready. Here you can see the black flooring sheets, towing mirrors, twin spare tyres and the twin stainless exhaust from Torqit. The removable rear draw compartment still not fitted yet in this photo which will hold the number plate.
 All new cars need to be weighed before rego. Above you can see the report explaining individual wheel weight and an overall weight of 2554kg. The kerb weight of a stock cruiser is 2175kg, that means the tray and those accessories fitted to it as per the pic above, roof platform & lighting, 5×35″ wheels/tyres, twin exhaust, GVM upgrade/heavier springs and the whole portal axle converson/replacement diffs came in at 379kg. Thats a bloody amazing result and has left me with a legal allowable payload of 1396kg. I have saved a lot of weight for now by not installing things like bull bar, side steps, canopy, second battery, tow bar or winches (at time of rego) and these are items most people overlook when building their ultimate tourer.
 A happy, but beaten man. This build was during the Dec2020 Covid19 lockdowns in Sydney Australia. Trying to get this registered during this time was difficult with the Service NSW (our local road authority) not allowing walk-ins at that time and our local government had put a ban on non-essential travel from your home or work. Because of the SSM modifications, I needed to present the original paperwork at the desk, and also to collect the custom number plates they had stored. This proved very hard but I got there in the end, it was Christmas eve to be exact. A well earned beer.
 The first profile shot with the new canopy on. It is far from finished yet with many things to go.
 Next up the the roof-top tent. I have chosen the Alucab Expedition Gen3. All aluminium and quite spacious and comfortable inside. My main reason for this choice among others was the overall aesthetic design and how it is tapered at the front in the X & Y plane, giving a streamline style and less wind resistance. It also has lighter canvas and suits me and my personal preference and can be set up or down in around 30 seconds or less.
 Starting to take shape now!
 Pumped guards for the portal builds. Trialing a few new things here, with the wheel 6″ lower than normal we fitted the fuel filler in the wheel arch, mounted to a removable aluminum panel which also keeps the rocks mud and sand from entering and collecting under the tray. It includes a silicone cap to stop shit getting in the key hole. Putting the filler there has given me a bigger toolbox to store my chainsaw and revovery gear.
 Absolutely love it.
 Still needs a tow bar & rear winch. More on that later. I think its fair to say, this car will be an ongoing project forever.
 For our 12v set up, we’ve gone with Enerdrive hardware and a Simarine touch screen display. Specs on this equipment are at the bottom of this post, but its proving to be the ultimate set up and would suit anyones needs and not over the top or over complicated. To brush the topic, its got 200ah Lithuim, AC & DC chargers, 2000w inverter, bluetooth connectivity and a few other goodies.
 Not having draws installed (which wouldn’t really work with a vehicle this high) has left me with more room than I know what to do with. Having the offset (north/south) divider has really helped. The other side will be my kitchen.
 The internal layout is modular and practical. The ability to pack your contents in minutes depending on your trip, length of travel and company is priceless, to me anyway. I dont see the point in lugging around everything all of the time whereas if things were packed on a trip-to-trip basis it just makes sense to me to only take what you need.
We love Australian made products, like these Expedition 134 modular storage boxes. . They’re waterproof, dustproof lockable, stackable boxes and work great with our aircraft style tie down track system you can see here.
We’re now proud to be the Sydney distributors and can include these boxes in your next build.
 Our first trip away Easter 21. Sneaky trip up to the Queensland border to test out living on the road. Not wanting campgrounds we foud this little patch of grass alongside a train line in Willow Tree, just shy of Tamworth.
 Plenty of room up here. When we sleep the pillows are up the other end so we can see the stars at night and watch the LED smart TV (yesss i know.) but great during long stayovers or prolonged rain.))
 Roadside lunch cookup QLD.
 Back at work and next was to come up with some sort of front mud flap/stone deflector. Because of the increased front wheel track I have already noticed the doors, sills and front edge of tray are copping it from the stones. Hanging a piece of rubber straight off the flare just didnt work so i have come up with a sheet metal guard extension and mudflap all in one.
 A good end view showing you how far out the wheels actually sit. By the way these are Positive 40 offset rims and 35″ tyres. Fully legal with the portal axle conversion.
 Done and dusted. Painted in Raptor.
 Next up was the intercooler replacement. I have chosen a PDI front mount aluminium intercooler core with this included stainless steel plumbing. (thats two cars worth in this image) As standard, this V8 diesels intercooler is situated on top of the engine relying solely on forced airflow from driving into the wind. This means when your driving slow like during 4WD your intercooler isnt working as efficient as it should. Having this intercooler not only looks the tits but will result in helping maintain power delivery due to cooler intake temperatures, and reduced EGT while under load and studies have shown to be 3x cooler just by not being in the engine bay and on top of the motor.
 As part of the Marks 4wd portal axle conversion, they had installed the compressor for the air-operated locking hubs directly where I need to run the new intercooler piping. To overcome this we came up with the idea to mount it in the cavity behind the drivers side headlight, just before the air intake. Although tricky to fit, it couldnt of worked out better- its out of the way, out of the heat, protected from dust mud and water and now not intefearing with the pipework. This has also allowed me to remotely mount the air filter and hide all the air lines within the guard.
 Our first trip away to the farm. Before we left, we stopped by our local beach, popped the tent and sat up there and watched the sunrise with a coffee and the paper.

 Finally arrived at our property. First trip out after some ridiculous government enforced lockdowns.
 Its good to be back. Especially after these Covid 19 lockdowns. First time away from work in a long time .
 Loving the look of the new intercooler in your face. I will be making a grill for it soon to protect it from sticks stones and the bugs .Next job was to tackle the bull bar and winch
 For the bull bar, I have decided to go my own way and do something custom. To start with I have purchased a 2nd hand ARB bull bar, cut it up and removed the wings and hoop leaving me with the centre main structure piece which i will build off.
 This is the only part I wanted to keep as this is the main structure that bolts to your vehicle. I have not modified or changed any section that fixes to the vehicle and will be using the same fixing points and bolts that came with the complete bar. I am merely redesigning the facade -the wings, and a new hoop section. Throughout this build I will be adhering to the ADR (Australian Design Rules) at all times and have not modified the airbag crumple zone in any way. I am also a qualified ticketed welder/fabricator with over 20 years experience in the trade. Details about bull bars here: https://roadsafety.transport.nsw.gov.au/downloads/technical-specification-bull-bars.pdf
 My blank canvas. From here we’re on our own.
 Trying to add some shape to the front and make this look unique to any other cruiser. No drawings, no 3d models or 3d scanners here.
 Here you can see I have fabricated new wing pieces from 2.5mm steel sheet and test fitted the Runva 13XP winch. I will be adding a removable aluminium cover for the winch so if i need to repair or maintain the winch, I dont need to remove the bull bar. You can also see here how I have mounted some slim LED light bars. These have proved extremely helpful for lighting up the bush to the sides of the road.
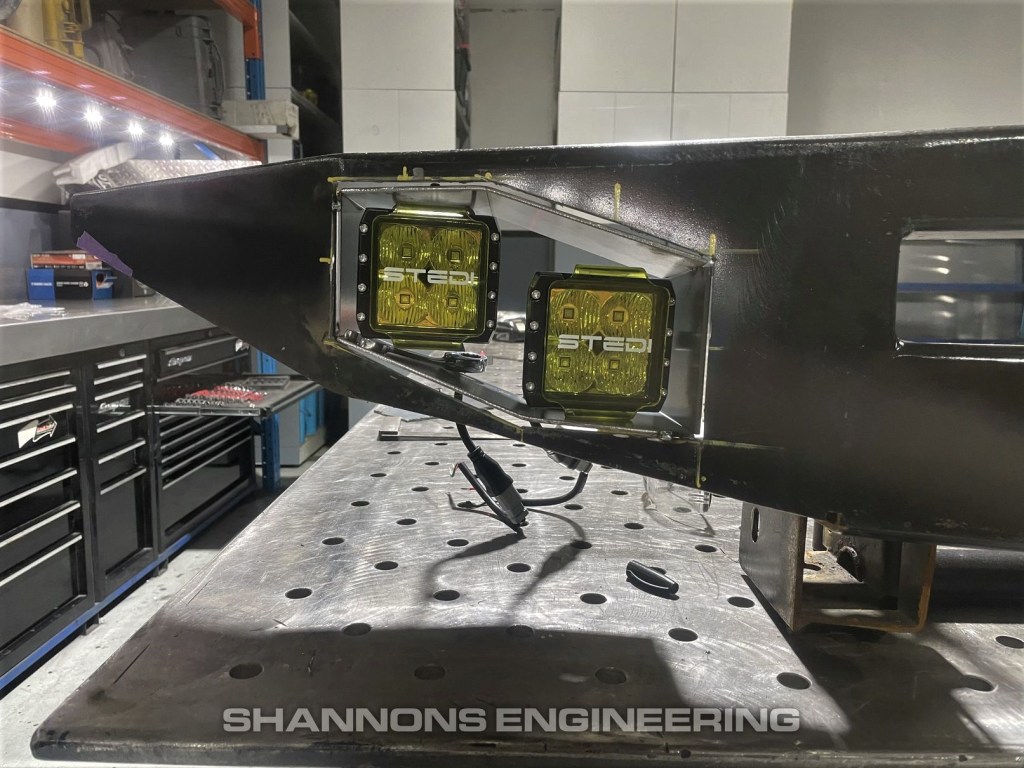 Back on the workbench and time to recess some LED flood/fog lights. You just dont see any decent fog lights on the market any more and think the yellow output is so underrated. It cuts through fog and rain without any glare.
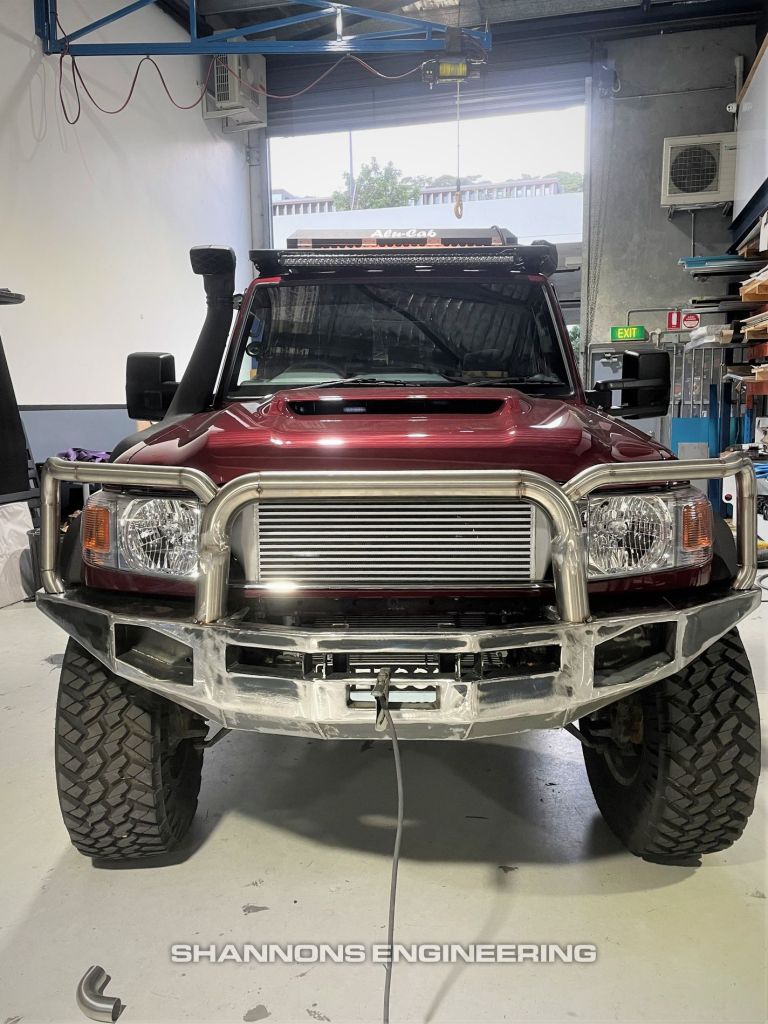 Front end taking shape now! As you can see the top hoops are made from stainless steel tube. The main objective here was to reduce weight to preserve my GVM. This is also why im not running brush bars or side steps.
 Some may argue using tube instead of heavy wall pipe is usless in an impact with an amimal. Have you seen how high the car is! Anything I hit is going under not over. Its providing all the protection I need for my headlights and bonnet from bashing through the bush. If it breaks, i will fix it.
 Quick trip away was booked in, so quickly slapped on some old epoxy paint with a roller, chucked the lights in and took off for a few days to test it out, see how it feels on the road etc and if any changes need to be made before it is stripped down for painting properly. Nothing was wired up and winch still missing. I ended up some deep scrub down the back paddock and pushed a few trees over for good measure, which explains the scratches. Real life testing.
 Clocking up the country k’s western NSW.
 Bar back off and planning out the wiring for the winch and 7 LED lights.
 Wiring done for both front and back winches. Rear winch has not been installed yet but have put the provisions in using the 000 gauge cable throughout. The biggest cable available so not to loose any current over the long distance.

 Without modifying the standard battery tray I have designed this alloy bracket to hold the two 500a isolator switches keeping the buttons accessable, and wiring all hidden. I will be setting this battery system up somewhat different to a typical 4wd dual battery system and will not be using a BCDC charger to maintain the second battery.
Instead I will be installing an Australian made Rapid Power fully sealed, liquid cooled alternator which pumps out 150a/14v and is designed for prolonged service in extremely dusty, wet and corrosive environments. The 70 series Land Cruisers weak spot is the standard alternator being so low in the engine bay, once she’s full of mud, you’ll be on a tow truck in no time.
I will be managing the charging of my second battery using a Blue Sea Systems ML-ARC Automatic charging relay. This thing’s a bloody beauty, it will automatically close the circuit when the engine’s running, charging my second battery at a much faster rate than a typical Recarc BCDC charger would. Then when you shut the engine off, it opens seperating the batteries so my start battery is safe from unexpected discharge. The beauty about this device is it also has a dash mounted switch allowing me to overide and link or seperate the two at any time, which will be usefull for winching or jump starting someone. I can even jump start myself if my main battery goes flat! It is also designed for full time marine use so its waterproof (IP66) with all stainless studs. Check out this link for more info!
And lastly the other BlueSea Systems MLRBS, this one will be used as a winch isolator, with the same in-cab switch and manual overide. This one does not have the automatic latching feature which is obviously not needed.
 The bull bar has been sent off for sandblasting, zinc powder coat rust proof primer, and has been rubbed back ready for the Raptor Liner treatment. I will be laying it on thick for a bullet proof finish.
 Winch is finally in. If any of you know your bull bars, you can see I have not modifed any part of the original ARB sub-structure and will be using the same mounting holes and bolts.
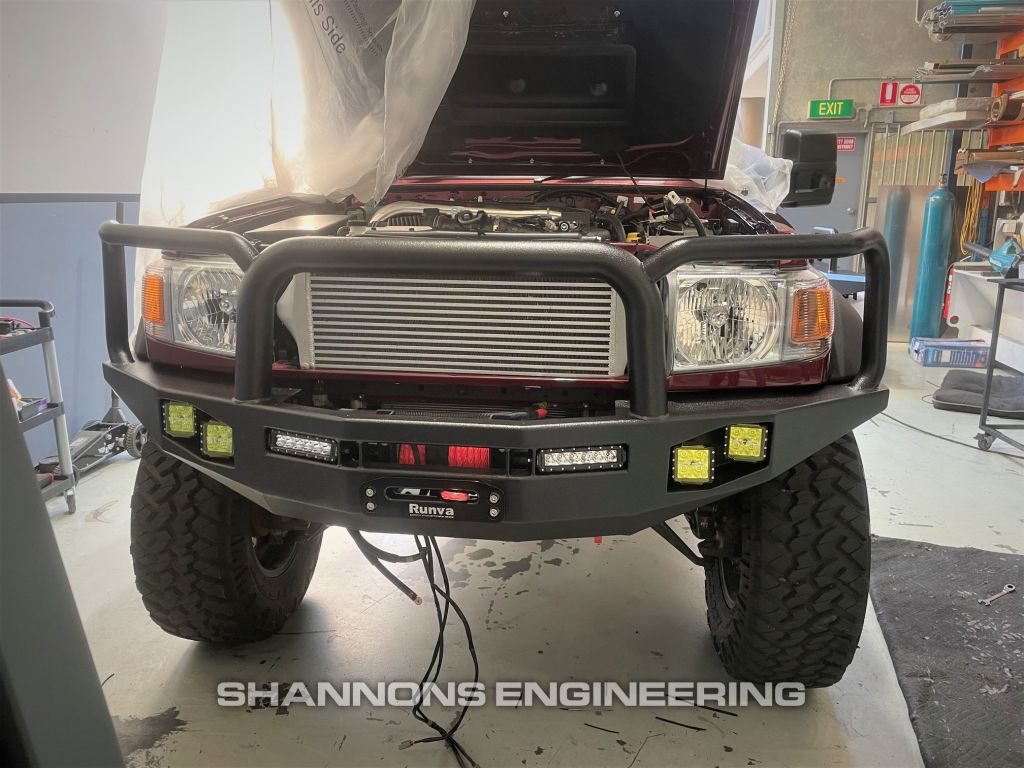
 This seriously could not have turned out better. Plenty of angles through triangulated bends, plenty of wheel clearance, great entry angle, close to the car and not poking out too far, bonnet/headlight protection and plenty of lights haha
 Quick trip out to my hunting cabin. Also finished making a grill for it. Laser cut stainless powder coated black and screwed into the genuine chrome surround.
To be continued..
Thanks for reading so far guys. Im not done yet so please check back soon!


Love it
Beautifully done 👍🏾♥️ I love it. Well documented procedure. Thanks
Having done multiple coil conversions and now this portal conversion – would you say there is much of a difference in ride quality/comfort with the portals?
Without a doubt, portals give you unmatchable ground clearance, wider track and lift without changing the suspension geometry. The ride depends on your choice of suspension and shocks. However, its undisputed coils give a better ride.
Did you also consider a chassis extension?
If so what was your reasons against it?
ENJOY YOUR SEBOSS
Love this SE Boss. For an exact build, how much will it cost to buy this vehicle. Please advise.
What an awesome build. Loved the read and the great pictures.
Thanks Chris.
Hey how much was your build $cost overall
Hi, just wondering how you rate the parabolic springs on the rear?
Hi Tim. Love them. More flex than some coil conversions and can take the weight. No complaints here!
An awesome write up mate. Love the details accompanied by the photos. Gives a good insight into the thought, dedication and work that goes into a build like this.
Thanks Dave. Appreciate the feedback